What matters most
- Define whether the part needs embedded hardware, grip, sealing, insulation, protection, or another integrated function.
- Review grade-level bonding, thermal exposure, contamination, and mechanical interlock options.
- Compare insert location, substrate support, shutoffs, gates, flash, and ejection.
Select the process from the interface requirement
Evaluate the technical choice together with part requirements, tooling consequences, production controls, and the evidence required for approval.
Function
Define whether the part needs embedded hardware, grip, sealing, insulation, protection, or another integrated function.
Compatibility
Review grade-level bonding, thermal exposure, contamination, and mechanical interlock options.
Tooling
Compare insert location, substrate support, shutoffs, gates, flash, and ejection.
Production
Include loading, automation, inspection, work-in-process, and expected demand.
Technical guide
The sections below retain the detailed design, tooling, process, and quality context needed to evaluate this topic beyond the summary.
Key Takeaways
- 1 Overmolding adds a second plastic material (typically TPE or TPU) over a molded substrate to create soft-grip surfaces, seals, or two-tone aesthetics; insert molding encapsulates a pre-made component — most often a brass or steel insert — in injected plastic to provide embedded threads, electrical contacts, or structural reinforcement.
- 2 Tooling investment ranges from $14,000–$28,000 for insert molding (single tool) to $18,000–$38,000 for overmolding (two tools); at volumes above 300,000 units per year, two-shot molding ($45,000–$95,000 tooling) delivers the lowest per-part cost at $0.43/part versus $0.74 for overmolding and $0.81 for manual insert molding.
- 3 Chemical compatibility governs overmolding bond strength: ABS and PC substrates pair well with TPE, TPU, and TPV overmolds; when chemical affinity is uncertain, mechanical bonding through dovetail holes in the substrate provides a reliable fallback that does not depend on resin chemistry.
- 4 The process decision is primarily driven by what you are combining: two plastics → overmolding or two-shot; plastic + metal → insert molding. Both capabilities can be engineered under one roof when your mold maker offers full-service multi-material tooling — avoiding the coordination cost of splitting the program across suppliers.
How Each Process Works
Despite being grouped together under the “multi-material molding” umbrella, overmolding and insert molding solve fundamentally different engineering problems through different mechanisms.
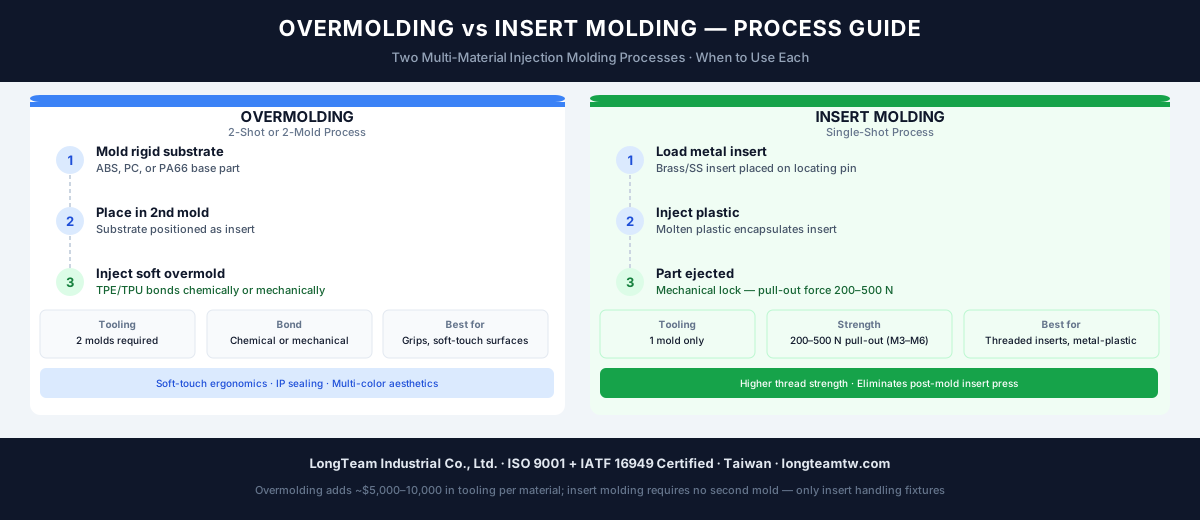
Overmolding is a two-step injection process. First, a rigid substrate — typically ABS, PC, or PC/ABS — is molded in Tool A. That substrate is then transferred (manually or robotically) to Tool B, where a softer second material is injected over selected surfaces. The result is a single assembly where two plastics are bonded together, relying on chemical affinity and, where possible, mechanical interlocking to achieve a durable joint. According to Unionfab’s 2024 multi-material molding guide, the most common application is adding a TPE grip surface to a hard plastic housing — the ergonomic handle found on power tools, medical devices, and consumer electronics.
Insert molding follows a different sequence. A pre-fabricated insert — most commonly a threaded brass bushing, steel pin, or electrical contact — is placed into an open mold cavity before injection. When plastic flows in and solidifies, it encapsulates the insert, creating a mechanical lock between the two materials. The bond here is primarily geometric: the plastic anchors around features on the insert’s surface rather than relying on chemistry. This process is widely used in electrical connectors, plumbing fittings, and any application that requires repeatable threaded fastening into plastic, where direct thread-forming into plastic walls would wear out prematurely.
Material Compatibility: Getting the Bond Right
In overmolding, bond strength is determined before the mold is designed. The substrate and overmold resins must be chemically compatible enough for the molten second material to wet and partially interdiffuse with the substrate surface during injection. SyBridge Technologies’ multi-material compatibility guide identifies three well-established pairings for engineering applications:
- ABS or PC/ABS substrate + TPU or TPE overmold — the most common combination in consumer electronics and handheld devices; strong chemical bond with standard processing temperatures.
- Nylon (PA66) substrate + TPV overmold — preferred in automotive applications where chemical resistance and elevated-temperature performance are required alongside grip or sealing.
- Polypropylene substrate + PP-compatible TPE — used in medical disposables and consumer packaging; requires careful resin selection since PP’s low surface energy makes bonding more sensitive to processing conditions.
When chemical affinity alone is insufficient, mechanical bonding through the substrate geometry provides a reliable fallback. As documented in Protolabs’ overmolding and insert molding design guide, adding through-holes in the substrate — particularly dovetail-shaped holes that widen toward the far side — allows the overmold material to flow through and lock mechanically even if chemical bonding is marginal. Wrapping the overmold around the edge of the substrate similarly increases interface area and peel resistance.
For insert molding, material compatibility is primarily a thermal expansion concern rather than a chemistry concern. Brass is the most widely specified insert material because its coefficient of thermal expansion (17–19 × 10&sup6;/°C) sits closer to most engineering thermoplastics than stainless steel does, minimizing stress at the plastic-metal interface during thermal cycling. Stainless steel inserts are used where corrosion resistance or non-magnetic requirements outweigh the thermal expansion mismatch.
Cost and Volume Analysis
The economics of multi-material molding shift significantly with annual volume. The table below models a representative 50 mm × 80 mm consumer electronics grip component at 500,000 units per year, with data sourced from MoldMinds’ 2025 multi-material cost analysis.
| Process | Tooling Cost | Cost/Part at 500K/yr | Cycle Time | Best Volume Range |
|---|---|---|---|---|
| Insert Molding | $14,000–$28,000 | $0.81 | 22–28 s + 8–12 s insert load | All volumes; ideal <100K/yr |
| Overmolding | $18,000–$38,000 | $0.74 | 22–28 s substrate + 24–35 s overmold | Best <50K/yr; viable to 300K/yr |
| Two-Shot Molding | $45,000–$95,000 | $0.43 | Single cycle: 28–40 s total | Economical above 300K/yr |
A critical but often overlooked cost driver in insert molding is operator labor. At a labor rate of $22/hour with a 30-second insert-loading cycle, manual insert handling adds $0.044 per part in direct labor — which compounds to $22,000 per year at 500,000 units. Robotic insert loading eliminates this variable but adds capital cost and fixture engineering.
Two-shot molding’s $0.38 per-part advantage over manual insert molding at 500,000 annual units means the $45,000–$95,000 tooling premium pays back in 12 to 18 months for high-volume programs. For programs below 50,000 units per year, neither two-shot nor the second overmold tool can be amortized efficiently — insert molding or single-step overmolding with a low-cost second tool is the correct choice at those volumes.
Design Rules That Determine Success
Both processes have geometry constraints that must be addressed in the substrate design — not in the overmold or insert tool — before any steel is ordered.
Overmolding: Thickness, Surface, and Venting
Overmold thickness directly determines the perceived feel of the finished part. Per Protolabs’ design guidelines, layers below 10 mm (0.40 in.) feel hard regardless of the overmold material’s Shore hardness rating. For cushioning applications, many product designers use tall, closely spaced ribs on the substrate surface to create an apparent thickness of 12–15 mm while minimizing actual material volume. The ribs also increase bonding surface area. Overmold walls should maintain consistent thickness across the shot to avoid differential cooling, sink, and delamination at the substrate interface. A minimum draft angle of 2° per side on all overmold walls is required for ejection from the second tool; increase to 3° for textured overmold surfaces.
Insert Molding: Sizing, Positioning, and Knurl Geometry
Brass threaded inserts are specified using an outer diameter determined by the screw thread class: the boss receiving the insert should have an inner diameter matching the insert’s outer diameter to within ±0.05 mm to avoid cracking during press-fit or ultrasonic installation. A plastic wall of at least 0.8–1.0× the insert outer diameter must surround the insert on all sides to prevent the plastic from splitting under injection pressure. Knurled or grooved insert surfaces dramatically improve torque resistance and pull-out strength compared to smooth inserts — always specify a knurl pattern when the insert will carry cyclic loading or vibration. Insert position must be held to within ±0.1 mm in the mold to prevent wall-thickness variation on the plastic side and ensure perpendicularity of the molded threads.
Decision Framework: Choosing Between the Processes
Most multi-material part requirements can be matched to a process in two questions. First: What are you combining? If you are joining two thermoplastics, overmolding or two-shot molding is correct — insert molding is designed for plastic-to-rigid-material bonds, not plastic-to-plastic. If you are embedding a metal or ceramic component in plastic, insert molding is correct. Second: What is your annual volume and budget? Below 50,000 units per year, standard overmolding with two separate tools minimizes tooling investment. From 50,000 to 300,000 units, the decision depends on DFM complexity and available press equipment. Above 300,000 units, two-shot tooling almost always delivers the lowest total cost of ownership even after the higher initial tooling investment is amortized.
A third consideration specific to Taiwan-based sourcing: verify that your mold maker performs both processes in-house. A supplier who outsources either the substrate tool or the insert handling to a sub-vendor introduces handoff risk, communication overhead, and split quality accountability. LongTeam’s in-house capability covers both overmolding and insert molding tooling on a single program, with DFM review that flags material compatibility, insert positioning tolerance, and overmold bonding strategy before any purchase order is issued.
Engineering a Multi-Material Part? Start with a DFM Review.
LongTeam Industrial reviews overmolding and insert-molding programs across automotive, consumer-electronics, and medical-device applications. Send your 3D model so the team can scope material compatibility, bonding strategy, insert positioning, tooling configuration, DFM deliverables, and quotation timing before steel is approved.
Contact LongTeam →What to confirm before supplier review
Use the drawing, material specification, expected demand, application conditions, and acceptance requirements to turn a general process discussion into a program-specific review.
- What component or material must be integrated?
- Is the interface chemical, mechanical, or both?
- How will inserts or substrates be located and detected?
- Which functional test approves the finished interface?
Continue the engineering review
Use the related guides and capability pages to connect this topic to part geometry, tooling, molding, and qualification decisions.