What matters most
- State whether the run checks tool function, process development, dimensions, appearance, automation, or production readiness.
- Record drawing revision, resin grade and lot, machine, tool configuration, and process conditions.
- Agree on sample quantity, inspection report, defect record, process data, and photographs.
Give every trial a decision and exit criterion
Evaluate the technical choice together with part requirements, tooling consequences, production controls, and the evidence required for approval.
Objective
State whether the run checks tool function, process development, dimensions, appearance, automation, or production readiness.
Inputs
Record drawing revision, resin grade and lot, machine, tool configuration, and process conditions.
Evidence
Agree on sample quantity, inspection report, defect record, process data, and photographs.
Disposition
Assign owners and due dates for tool changes, process work, design decisions, and the next approval gate.
Technical guide
The sections below retain the detailed design, tooling, process, and quality context needed to evaluate this topic beyond the summary.
Key Takeaways
- 1 T0 is a mechanical dry run with no plastic — it confirms the mold opens, closes, and ejects correctly before any resin is shot. Skipping T0 typically surfaces mechanical failures during T1, adding a full revision cycle.
- 2 T1 is an engineering trial — not a product preview. Expect dimensional deviations and surface defects; the goal is eliminating gross structural failures, not achieving print compliance yet.
- 3 T2 is where process parameters are locked and dimensional targets are proven — a complete T2 package includes CMM results, Cpk analysis, and a frozen process parameter sheet your quality team can sign off on.
- 4 Programs that document and resolve T1 findings in writing avoid trans-Pacific correction loops that cost $3,000–$7,000 per round-trip and 4–8 additional weeks — the clearest ROI argument for rigorous pre-shipment mold trials.
What Is a Mold Trial — and Why Does the Sequence Matter?
A mold trial is a structured test run of a newly completed injection mold, conducted before the tool is approved for production. The purpose is straightforward: to confirm that the mold produces parts within dimensional, cosmetic, and functional specifications under controlled process conditions. What is less obvious to many OEM buyers is that mold trials are not a single event — they are a staged qualification protocol, each stage with its own acceptance criteria, documentation requirements, and decision gates.
The sequence T0 → T1 → T2 → T3 exists because catching problems early is exponentially cheaper than discovering them later. A dimensional error found during T1 — and corrected with a targeted steel modification — costs a fraction of what the same error costs when it surfaces in production. According to MoldMinds, unqualified offshore tooling programs show rework rates 40% higher than qualified-vendor programs that enforce a structured trial protocol. For OEMs sourcing from Taiwan or other offshore facilities, understanding what to expect at each stage is the single most effective way to compress project timelines and control tooling risk.
The four stages below map the standard protocol used by ISO 9001– and IATF 16949–certified mold makers, including the documentation your engineering team should request at each gate.
The Four Trial Stages: T0 to T3
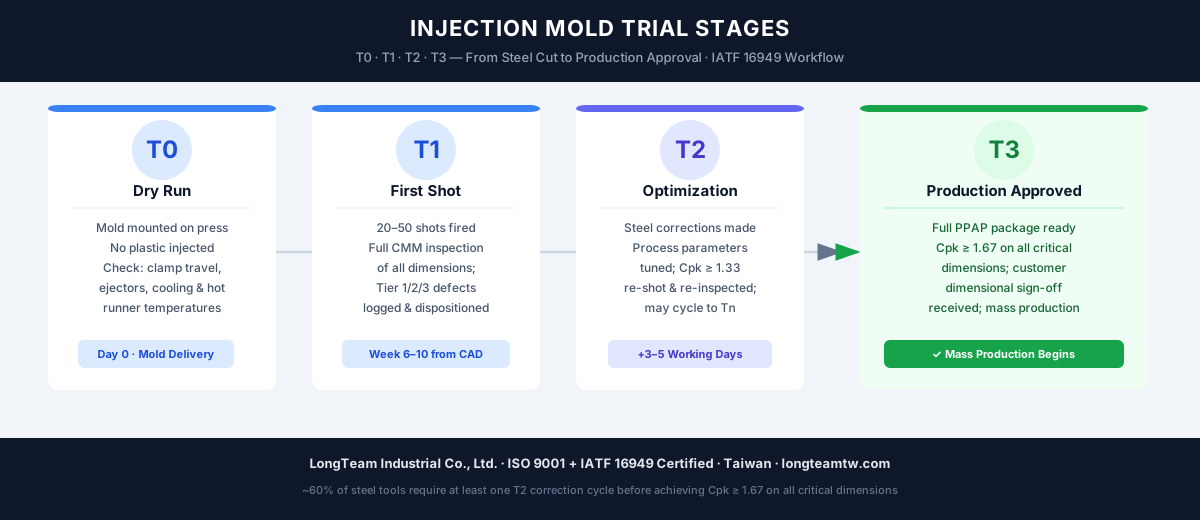
T0 — Mechanical Dry Run (No Plastic)
T0 is performed immediately after the mold is assembled, before any resin is introduced. The mold is mounted in the press and cycled through its full mechanical sequence: mold open and close, ejection stroke travel, side-action and lifter movement, cooling circuit pressure and flow, and parting-line contact and clamping force distribution. The goal is to confirm the tool is mechanically safe to shoot — not to evaluate part quality.
Common T0 findings include misaligned guide pins, insufficient ejector-stroke travel, cooling circuit leaks, and parting-line step errors. Identifying these issues before the first shot eliminates the risk of mold damage from premature plastic injection and avoids attributing process-parameter causes to what are actually mechanical problems. A thorough T0 typically takes 2–4 hours; skipping it routinely surfaces those same mechanical failures under thermal load during T1, adding a full revision cycle to the project timeline.
T1 — First Shot Trial (Engineering Evaluation)
T1 is the first time plastic is shot through the mold. Per MoldMinds’ T1 process guide, a standard T1 run requires a minimum of 20–50 shots: the first 5–10 shots are used to stabilize process conditions (mold temperature, melt temperature, injection pressure), and shots 11–30+ are evaluated for dimensional compliance and defect classification. Every process parameter is recorded: shot size in ounces, injection speed in in/s, pack pressure in PSI, cycle time in seconds, and mold temperature.
T1 is an engineering trial, not a product approval. The evaluation team assesses fill completeness, gross dimensional deviation from nominal, and structural defects: short shots, flash, sink marks, weld lines, burn marks, and ejection damage. Minor cosmetic issues are noted but do not block progression to T2. The mold maker documents all findings against a part checklist and issues a written T1 report with CMM measurements, defect photographs, and a proposed corrective action plan for each open item.
Buyers who treat T1 samples as finished-product previews almost always face disappointment and delay. The correct role of the OEM at T1 is to review the written report, confirm the proposed corrective actions address root causes, and approve the modification plan in writing before T2 steel work begins.
T2 — Process Optimization Trial (Dimensional Compliance)
T2 incorporates all T1 corrective actions and re-runs the mold with tuned process parameters. At T2, the objective shifts from structural evaluation to dimensional and cosmetic conformance: achieving all print dimensions within tolerance, eliminating Tier 1 and Tier 2 defects from T1, and locking down the process parameter window. EPowerCorp describes T2 as producing “parts much closer to final production quality” through fine-tuning of injection pressure, cooling time, and material flow.
The documentation package at T2 is substantially more rigorous than T1: a full CMM dimensional report against every callout on the drawing, a First Article Inspection (FAI) report, and — for automotive programs under IATF 16949 — a process capability study showing Cpk ≥ 1.33 minimum (Cpk ≥ 1.67 for critical dimensions). A Level 3 PPAP submission typically requires 30 or more CMM-measured parts. If T2 results fully conform, the mold is approved for production. Complex parts with tight tolerances or multiple side actions may require a T3 cycle.
T3 — Production Validation Trial (Repeatability Proof)
T3 is required when T2 has resolved all individual defects but production-rate repeatability must be formally demonstrated — typically for automotive PPAP Level 3 submissions, multi-cavity balance verification, or first-time supplier qualification under a new OEM quality plan. T3 simulates full production conditions: production-rate cycle time, production-lot resin, and production-shift changeover sequences. A successful T3 run produces a signed PPAP package or equivalent quality documentation enabling production release. Any unresolved T2 item that surfaces at T3 is treated as a production non-conformance rather than a tooling issue — which is why reaching T3 with open T2 findings is a costly mistake to avoid.
Documentation Your Mold Maker Should Deliver at Each Stage
Knowing what documentation to request — and when — is the most practical lever OEM buyers have over tooling quality. The table below summarizes standard deliverables at each stage for a certified mold maker operating under ISO 9001 or IATF 16949 trial protocols.
| Stage | Shots Run | Documentation Delivered | Buyer Action Required |
|---|---|---|---|
| T0 — Dry Run | 0 (mechanical cycle only) | Mechanical function checklist; cooling circuit pressure log; ejection stroke measurement | Review and approve T0 report before T1 is scheduled |
| T1 — First Shot | 20–50 shots | CMM spot-check on 3–5 critical dims; defect photo log; process parameter record; corrective action plan | Approve corrective action plan in writing before T2 steel work begins |
| T2 — Optimization | 30–100 shots | Full CMM dimensional report; FAI report; Cpk/Ppk study for critical dims; locked process parameter sheet | Sign off on dimensions and Cpk results; confirm production release or escalate remaining open items |
| T3 — Validation | 30+ (production conditions) | Full PPAP Level 2/3 package (automotive); signed FAI; production process control plan; SPC data | Issue production release authorization; file PPAP with your quality system |
How to Read a T1 Report: Three-Tier Defect Classification
A T1 report from a structured mold maker organizes findings into severity tiers, each with its own disposition. Understanding this classification — documented by MoldMinds and GoodTech MFG — lets buyers evaluate whether a report is complete and actionable rather than just a photo album.
| Defect Tier | Severity | Typical Examples | Disposition |
|---|---|---|---|
| Tier 1 — Stop-Ship | Critical | Dimension out of tolerance by >50% of allowable band; uncontrollable flash; ejection failure risking equipment damage | Halt trial; root-cause investigation and mold modification required before T2 |
| Tier 2 — Correct Before T2 | Major | Visible cosmetic surface flaw; weld line in structural zone; gate vestige out of spec; sink mark exceeding depth limit | Document and resolve in T2 steel modifications; do not proceed to production with open Tier 2 items |
| Tier 3 — Monitor at T2 | Minor | Slight underfill on non-structural area; minor dimensional drift within tolerance; surface mark in hidden zone | Track at T2; escalate to Tier 2 if not resolved by process tuning alone |
A moderate-complexity tool typically generates 4–8 Tier 2 and Tier 3 items at T1 — this is normal and expected. A T1 report with zero findings should prompt further scrutiny, not satisfaction: it may indicate insufficient measurement coverage. A report with multiple unclassified Tier 1 items and no corrective action plan is a clear sign the mold maker is not running a structured trial protocol.
For Taiwan-sourced tooling, the financial case for rigorous T1 documentation is direct: catching and resolving issues at T1, on-site, costs a fraction of returning a non-conforming mold across the Pacific. A single trans-Pacific correction loop costs an estimated $3,000–$7,000 in re-tooling freight, re-inspection, and re-trial time, plus 4–8 additional weeks before production can start, per MoldMinds. Written T1 reports, reviewed and approved by the buyer before the mold ships, are the most effective safeguard against this outcome.
Request LongTeam’s Structured Mold Trial Protocol for Your Next Program
LongTeam Industrial scopes injection-mold trial stages and documentation to the program’s approval requirements. T0, T1, T2, dimensional-inspection, corrective-action, and language requirements are agreed before the mold ships. Contact us to discuss your tooling program and review a sample trial report from a comparable part.
Contact LongTeam →What to confirm before supplier review
Use the drawing, material specification, expected demand, application conditions, and acceptance requirements to turn a general process discussion into a program-specific review.
- What does each trial label mean for this supplier and program?
- Which parts are measured and under what conditions?
- How are deviations and tool changes recorded?
- What evidence is required before the next stage?
Continue the engineering review
Use the related guides and capability pages to connect this topic to part geometry, tooling, molding, and qualification decisions.